Metadata
-
Date
-
Tagged
-
Older post
-
Newer post
Automation with git hooks

Automation shines when it’s …well… automatic.
Git hooks allow you to run some code on specific triggers. At certain points during the git lifecycle, a trigger happens and the code associated with that trigger runs.
I think of it like automated sliding doors. When the sensor sees you, the doors open.
For example: Running a linting/formatting command just before you git commit would use the pre-commit git hook.
Those hooks are scripts located in the .git/hooks directory.
By default, the files there are bash scripts, but the only requirement is that the file is executable.
Sharing git hooks with other people without any tools is quite cumbersome. The .git directory is not part of the git repository, kinda (how meta).
Making sure everyone uses the same hooks and has the required local tools to run them, quickly becomes a chore.
Husky
Husky is a tool that makes it convenient to define and share git hooks in a JavaScript project.
Install
npm i husky -D# oryarn add husky -DConfigure
After installing the tool, create a file called .huskyrc.json in the root of the project.
That file will hold the configuration for this tool.
{ "hooks": { "pre-commit": "npm test" }}Use
The pre-commit hook will trigger every time code is commited to the (local) repository.
The commit will only go through if the script (npm test in this case) returns without a failure.
When using a pre-commit hook, everytime you commit you can sing:
🎵 A full commitment’s what I’m thinking of. 🎵
The image below shows the terminal output when trying to commit to a freshly bootstrapped Gatsby app.
The test command that is ran during pre-commit exits with a 1, signalling an error.
This failure prevents the commit from being applied.

Lint-staged
The lint-staged tool allows you to execute a script with a list of staged files as an argument.
Install
npm i lint-staged -D# oryarn add lint-staged -DConfigure
After installing the tool, create a file called .lintstagedrc.json in the root of the project.
That file will hold the configuration for this tool.
Configuration should be an object where each value is a command to run and its key is a glob pattern to use for this command. This package uses micromatch for glob patterns.
{ "*.{js,jsx}": "eslint --fix"}The config above will take each staged file that ends in .js or .jsx and add them as arguments to the eslint --fix command.
If iLikeTurtles.js and Boop.jsx were changed, saved, and git added, this would result in the following command:
eslint --fix iLikeTurtles.js Boop.jsx.
After that command successfully completes, the (possibly altered) files will be git added again.
Use
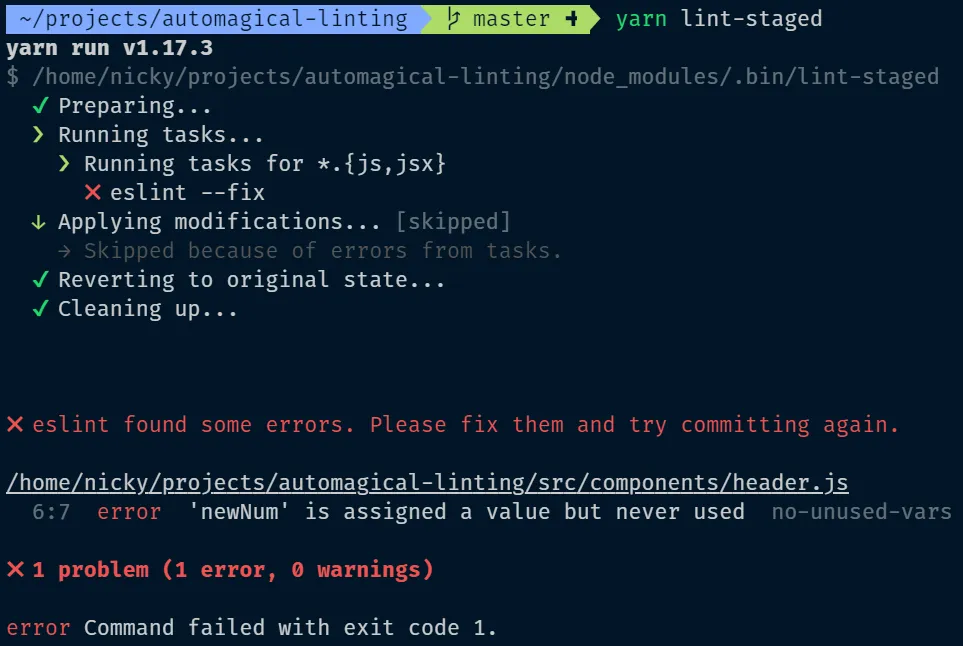
npx lint-staged# oryarn lint-stagedAs example, below is a (badly formatted) piece of code that was added to git before running lint-staged.
var num=1var newNum=num+5;;The eslint --fix command that is ran during lint-staged exits with a 1, signalling an error.
This failure causes lint-staged to fail and also exit with a 1 code.
Automate
This presents an ideal usecase for automation.
By combining husky and lint-staged.
Right before committing, a piece of code can be executed that is designed to run on every staged file (e.g eslint).
This can be done by editing .huskyrc.json to execute lint-staged on the pre-commit trigger.
The commit will only go through if the script (lint-staged in this case) returns without a failure.
{ "hooks": { "pre-commit": "lint-staged" }}This setup will only lint files that are about to be committed, saving time, as linting an entire project can take a long time.
Commitlint
The commitlint tool allows you to execute a script that checks a string and applies some rules to it.
As the name suggest, this tool is often used to check commit messages.
The tool can be used to enforce commit messages to meet the standards of the conventional commit format. It is often recommended commit messages convey the “Why?” in the title, and the “What?” in the body. The answer to “How?” is visible by looking at the committed code.
Along with increased clarity, using a consistent commit message format has many benefits.
Install
npm i @commitlint/config-conventional @commitlint/cli -D# oryarn add @commitlint/config-conventional @commitlint/cli -DConfigure
After installing the tool, create a file called .commitlintrc.json in the root of the project.
That file will hold the configuration for this tool.
Similar to ESLint (a linter for JavaScript code), commitlint can be extensively configured.
{ "extends": ["@commitlint/config-conventional"]}The config above will apply the rules set in @commitlint/config-conventional to every commit message that is checked by commitlint.
Use / test
Testing a message to see the output can be done by piping the message into commitlint:
echo '<your-commit-message>' | npx commitlint# orecho '<your-commit-message>' | yarn commitlintThe image below shows the terminal output when checking a string (that does not follow the rules we set) with commitlint.

Automate
The linting of commit messages is another ideal usecase for automation with git hooks.
By combining husky and commitlint. Right before committing, the attached commit message can be checked.
This can be done by editing .huskyrc.json to execute commitlint on the commit-msg trigger.
{ "hooks": { "commit-msg": "commitlint -E HUSKY_GIT_PARAMS" }}The commit will only go through if the script (commitlint in this case) returns without a failure.
CLI-prompt tool
While manually authoring commit messages that adhere to the rules can be done, having a way to guide you when writing commit messages is very useful.
The commitlint CLI-prompt helps with fast authoring of commit messages and ensures they follow those rules.
Install
npm i @commitlint/prompt-cli -D# oryarn add @commitlint/prompt-cli -DUse
npx commit# oryarn commitTo make it easier to use, add this command to the "scripts" key of the repository’s package.json
{ "scripts": { "commit": "commit" }}Committing to the repository can now be done by executing that script.
The script will take you through an interactive CLI prompt with the following steps:
- type
- (optional) scope
- subject
- (optional) body
- (optional) footer
Each step will display the amount of characters that are left until the maximum length (set in the rules) will be reached.
If you type help, if applicaple, the available commands for that step will be listed.
e.g. typing help during the type step shows the correct types to choose from (chore, feat, fix, …).
Any optional step can be skipped by typing :skip.
Conclusion
Git hooks are a useful method to automate workflows and enforce code standards. All git repositories (regardless of the language they are written in) can use them.
Taking a JavaScript project as example, the husky package provides a convenient way to share a specific hooks setup with everyone that clones that repository.
Code linting and formatting standards are enforced by using lint-staged.
Commit message standards are enforced by checking the message with commitlint.
Have any ideas to further automate workflows (with git hooks)? Please let me know on twitter!